VScode配置Python远程调试
必要插件安装
- 安装Remote-SSH (或者Remote Development这个插件合集,其中包含了SSH)
- 安装Python Extensions
远程服务器配置
点击Remote Explorer,在下拉框中选择SSH Targets,点击⚙️配置C:\Users\Administrator\.ssh\config
# Read more about SSH config files: https://linux.die.net/man/5/ssh_config
Host Deep-H
    HostName 192.168.1.XX   # 服务器IP
    User XXXXX              # 用户名
如果报错,尝试在VScode设置中搜索Show Login Terminal,勾选下方Always reveal the SSH login terminal。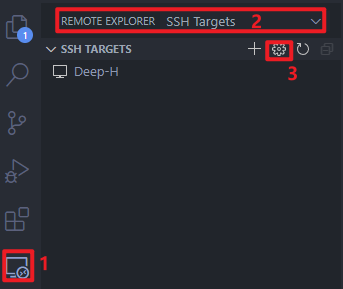
配置完成后,在需要连接的条目上右键,选择Connect to Host in New Window或者Connect to Host in Current Window
配置服务器免密登录
在本地生成公-私钥对
ssh-keygen -t rsa -b 4096 -C "your_email@example.com" -f ~/.ssh/文件名
# -t type 指定要创建的密钥类型。可以使用:“rsa1”(SSH-1) “rsa”(SSH-2) “dsa”(SSH-2)
# -b bits 指定密钥长度。对于RSA密钥,最小要求768位,默认是2048位。DSA密钥必须恰好是1024位(FIPS 186-2 标准的要求)。
# -C comment 提供一个新注释
# -f ~/.ssh/文件名 公钥和私钥的输出位置和对应的文件名
# 最简单常用的用法:
ssh-keygen -t rsa -C "your_email@example.com"
命令运行之后,会在.ssh文件夹下生成id_rsa.pub和id_rsa
在远程端添加公钥
进入~/.ssh将id_rsa.pub的内容追加到authorized_keys中
# 如果没有.ssh文件夹则创建
mkdir ~/.ssh
# 如果没有authorized_keys文件则创建
touch ~/.ssh/authorized_keys
# 确认.ssh和authorized_keys的权限,必要时修改权限
chmod 700 ~/.ssh
chmod 600 ~/.ssh/authorized_keys
# 追加id_rsa.pub内容,此命令需确保.pub文件与authorized_keys在同一目录下
cat id_rsa.pub >> authorized_keys
修改Remote-SSH配置
# Read more about SSH config files: https://linux.die.net/man/5/ssh_config
Host Deep-H
    HostName 192.168.1.XX   # 服务器IP
    User XXXXX              # 用户名
    IdentityFile XXXX\.ssh\id_rsa     # 本地生成的私钥文件
Python代码调试
配置Python环境
Run->Add Configuration...->Python File打开launch.json文件,在该文件中配置:
{
    // Use IntelliSense to learn about possible attributes.
    // Hover to view descriptions of existing attributes.
    // For more information, visit: https://go.microsoft.com/fwlink/?linkid=830387
    "version": "0.2.0",
    "configurations": [
        {
            "name": "Python: Current File",
            "type": "python",
            "request": "launch",
            "program": "${file}",
            "console": "integratedTerminal",
            "justMyCode": true,
            "cwd": "${fileDirname}"  // 设置相对路径,在debug时可以切换到当前文件所在目录
        },
    ]
}
F1->Python: Select Interpreter选择Python解释器
本作品采用 知识共享署名-非商业性使用-禁止演绎 4.0 国际许可协议 (CC BY-NC-ND 4.0) 进行许可。